Hello there!! Ouma Here. I am so happy that you’ve taken time out of your busy day to visit my blog.
I am so excited and quite honestly a bit nervous about this blog post (for many reasons). I’ve mentioned in previous posts, that I am participating in the Altenew Educator Certification Program. Well this post and the work that I have completed thus far basically determine if I make past Level II and on to Level III. It also marks my first time adding videos to my blog. This is also probably the longest post thus far; so THANK YOU FROM THE BOTTOM OF MY HEART for spending time here. I know that there are literally a million other things that you could be doing right now.
The Challenge this go around was to:
1). Select three components from the classes taken during Level I and II and explain them.
2). Share Design Tips (if I have any).
3). Make four masculine cards with the following themes: Birthday, Love/Thinking of You, Anniversary and Encouragement.
4). Create an altered/upcycled project.
5). The Challenge Blog Post must contain a detailed step by step photo tutorial and or YouTube Video in addition to including a minimum of 10 pictures; close up and process.
Phew!! Quite a challenge right?? Here’s what I came up with.
This blog contains paid advertising banners and affiliate links (Shopping/Affiliate Disclosure). Banners and affiliate links may be used at no additional cost to you. This means that I may get paid a small commission when you shop with a company using a link I provide. I am not paid by any company to use their products. All products used in my posts have been purchased by me. Should this change, that detail will be fully disclosed in that specific post.
Components
To be honest it was a bit difficult narrowing this list down. I’ve learned so much from taking courses through Altenew Academy. The courses are very detailed and great for beginners and seasoned card makers. The components I chose are outlined below. You can see that the cards actually feature more than one single technique.

- Course: Let It Shine: Let It Shine was all about using different techniques to add “SHINE” to a project. I used a number of different mediums to add Shine to my cards and to my Altered Project. Glitter Cardstock, Hot Foil and Glimmer Paste were the mediums I chose to add subtle shine to the cards. Foil – Let It Shine
- Course: Celebration Stencil Techniques . This course teaches ways to use stencils to create beautiful projects while minimizing the number of supplies used. I used a stencil to create an eye catching background for a very simple card.
- Course: Easy Die Cutting Techniques. I think the name really speaks for itself. To illustrate what I learned, I used a cover die to create a very simple background on one card. As a bonus, I also did some simple embossing.
- Course: Beyond Basic Backgrounds: As the title eludes, this course is all about using different tips tricks and techniques to take card backgrounds to the next level. In my case I tried two new techniques. First I used Glimmer Paste and a stencil to create a raised and textured background for one card. For another, I stepped outside of my comfort zone a tried something new (literally my first try) and used a background die with a hot foil system to create a unique background.
Tips and Suggestions
- Write it down: For me this is a big one. Although not necessarily a design tip, it does help me to visualize my tasks and begin to organize my thoughts (which are usually a tad bit scattered).
- Review and Revise: This is huge. I’ve learned that projects almost always evolve and are very seldom exactly like my original vision. Reviewing and Revising helps me to make sure that my project can be implemented.
- Organization: This is something that I am still working on but getting better at. Being organized is critical (to me) to being able to complete a project with minimal frustration. There’s nothing worse than spending 20 minutes digging and searching for something that you know you have but cannot locate because you aren’t organized. I recently began re-organizing my craft room. Well more like a mini makeover. Let me tell you I am so much more productive now that everything has a place.
- Think outside of the box and try something new: In my normal life, I tend to be a very straight and narrow and by the book type of person. I’ve found however that my creativity absolutely requires me to try new things and remove my normal by the book mentality. For example, I combined the Dodec Cover Die with Hot Foil to create an awesome background (love how it turned out).
- It’s okay to make mistakes: MISTAKES WILL BE MADE AND IT IS OKAY!!!! Although frustrating, it is important to know that its okay to make mistakes. Some of my biggest mistakes have turned into beautiful projects.

Here’s a small peak of my craft space. It is by no means fancy but it is the Taj Mahal in comparison to my previous setup (I’ll do a post once everything is where I really want it).

Having a dedicate space to organize my ink cubes, sequins, buttons etc is priceless.


The Cards
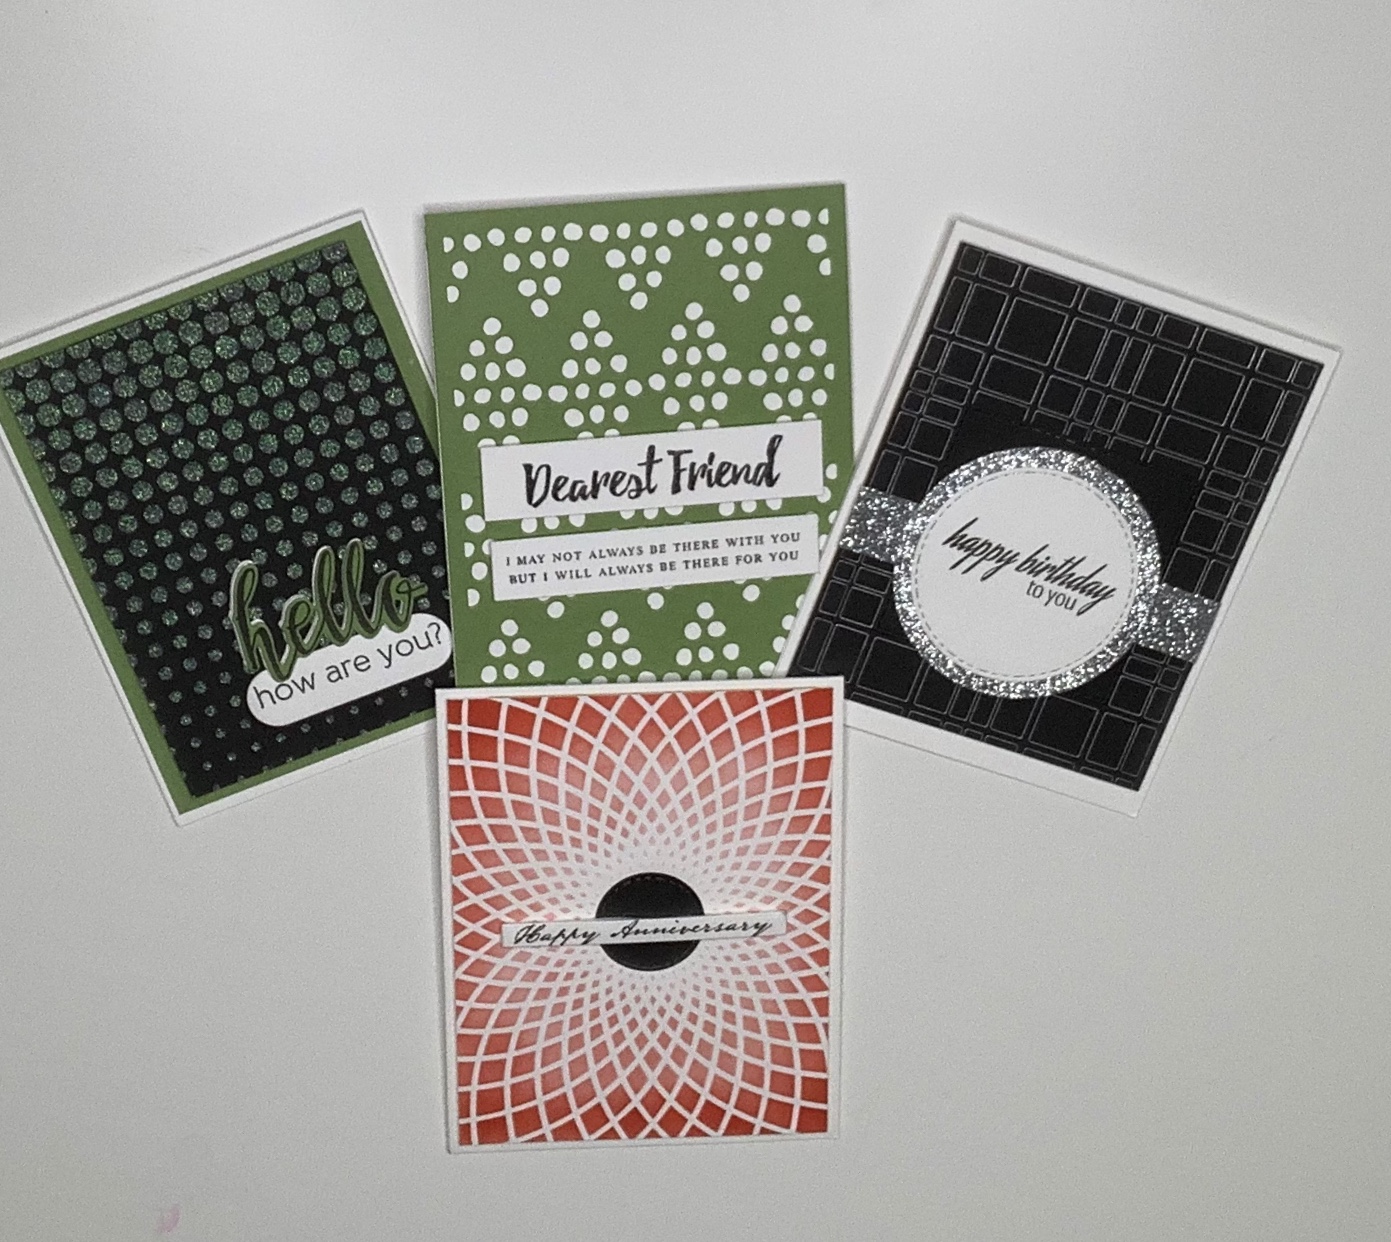
Now to get down to the nitty gritty. Four Masculine cards. It took me a minute to figure out what direction to take here. For some people masculine means food or games, sports etc. I decided to take a different approach. There are many ways to make a card masculine. Color and materials used (in my opinion) are key. I decided to use darker tones and zero floral prints (this was difficult for me lol). I also decided to limit shine as much as possible. Ultimately I wanted each to be able to be given to any man in my life.

For my first card, I decided on a birthday theme. I used the Layered Plaid Cover die along with a foiling tool to create the beautiful background. Normally, the background would have had cutouts but by using the hot foil system, I ended up with a beautiful inlaid silver foil pattern. For contrast, I created a band out of glitter Cardstock. I cut a rectangular piece and then a circle using circle dies. A circle die was also used to cutout the happy birthday sentiment which had been stamped on a piece of heavy Cardstock. Foam tape was added to the back of the black foiled piece and then placed on top of a top folding white note card.

The second card is probably the simplest of the four. I wanted to focus more on the sentiment and creating a unique background. I used a cover die to create the dotted effect. The sentiments were stamped separately using crisp black ink, heavy Cardstock and sentiment strip dies. After stamping and embossing, foam tape was added to the back of each and they were added to the green background panel. Strong adhesive was then added to the back of the green panel and it was added to a top folding note card.


With respect to colorful the third card is probably the boldest. The materials used to create this card were minimal. I applied a stencil to a piece of heavy white Cardstock. After making sure that the stencil was secure I applied color using Heartbeat Red Ink and a blending brush. Varying levels of pressure were used to create an ombré effect. I used a circle die for the black circle in the center. Happy Anniversary was stamped on to a scrap piece of heavy Cardstock using black ink and cut out using a sentiment strip die. Foam tape was added and it was placed on the center of the card.

I like the background on the fourth card the best. Something about the combination of the color and texture is just awesome. As with the other three cards, the materials used were minimal but still resulted in a lovely card. For this background I used glimmer paste, pearl alcohol drops and a stencil. I mixed the pearl alcohol drops with the glimmer paste to change up the color. I initially planned on using a white glimmer paste but to my dismay it was completely dried out when I opened it. I guess I didn’t secure the top properly the last time it was opened (WAH!!). After mixing I used a pallet knife to apply the paste over the stencil. TIP: Always clean off your stencil, pallet knife and workspace immediately after using the paste so nothing is ruined. After applying the paste, I trimmed the panel and added on top of a green piece of Cardstock. The hello sentiment was stamped and die cut and layered (bottom layer white) to create contrast. The entire panel was secured to a top folding note card.
Altered Project
The inspiration for my altered project was a beautiful young lady named Chloe Hiller the current Miss Paradise Valley Outstanding Teen. This young is an inspiration for us all. Her platform #GirlsDreamBelieveandAchieve “is a movement that she created to set the tone for how self-confidence and peer support can empower young girls to think, grow and be powerful”. Chloe is currently competing in the Miss Arizona pageant so I thought I would create something for her so that she can record her thoughts, dreams and experiences and show her that she has a huge support system.

I picked up this chipboard journal from Michael’s because I I liked the way that it opened. I also like that the pages are completely blank; no lines at all. This way she can draw, or write or whatever she wants.

This is the original sketch that I came up with. I eventually ended up changing it because I wanted to try and use as many of the supplies that I already had on hand.

After completing an assessment of the tools that I had available, I decided to use the stencil that I used to create the anniversary card shown earlier. I thought it would be cool to create a stenciled background using some of Chloe’s favorite colors (Yellow/Pink/Orange).
I stenciled the both front and back of the journal using a blender brush and then went over each cell with a glitter brush.


Next I cut out Chloe’s initials using pink and orange Cardstock. I layered the letters placing them in opposing corners. I added ribbon, wrapped it around the front and back securing with strong adhesive. The butterfly was secured to the right side of the flap only – using E6000 Glue.


For the inside, I incorporated Chloe’s platform Dream, Believe, Achieve, spelling out each word using glitter card stock. I also added inspirational quotes and carried the butterfly throughout the journal.


The last part of the altered project consisted of taking a piece of velvet ribbon and turning it into a beautiful bookmark.
That folks brings me to the end. I have learned so much over the past few months. I am very happy to have learned about Altenew, their products and the certification program. Going through this process makes me super excited about the future and all the possibilities ahead. I have so much more to learn, but I AM READY!!
THANK YOU for sticking through this post. I know it was a long one. I do hope that you’ll stop by again and that you have seen something here to inspire you. Don’t forget to spread kindness! – Ouma

Wow…..Ta-KI–SHA!!!! Your projects are simply amazing! I can’t even begin to tell you how much I enjoyed this post. You have really made huge progress since you started AECP! You now even make multiple videos! Your thoughts and share are invaluable to those who are just starting out in stamping. I love that you take the time to write down each step and share in such a thorough and visually-appealing process! Congratulations on making this milestone! I gave every one of your videos a big thumbs-up! I hope that you gain more confidence and continue to share via posts and videos! I am so glad that you enter your beautiful work in Altenew AECP assignment Gallery. Awesome work indeed!
Thank You Virginia 🙂
I appreciate all of your feedback and encouragement.
Goodness! You made a video for EVERYTHING!!! Girl! This post is awesome. YOU are awesome. What a lovely set of cards and your project is fantabulous too!! I like that you kept your design simple and still they packed a punch with the foiling/glitter etc. Fantabulous job!
Thank you for entering your gorgeous work to the AECP gallery. Keep it up!
Thank you Erum 🙂