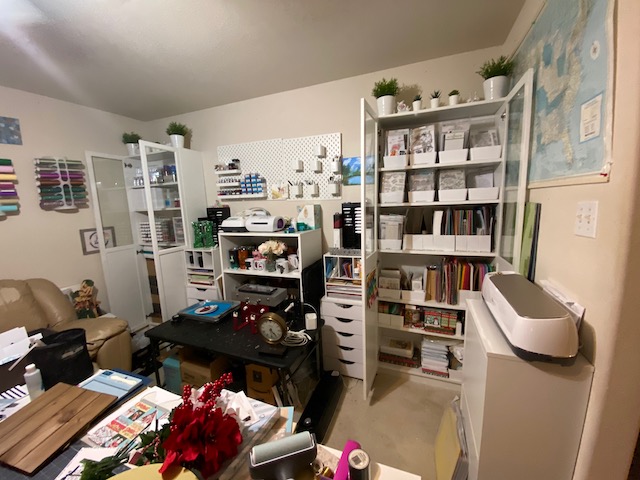
I have a confession to make. I have a serious issue when it comes to crafts. I CANNOT STOP BUYING STUFF!! I am a bonafide CRAFT-O-HOLIC! Believe it or not, three years ago I had no craft room. No stamps, no dies and definitely no Cricut. My obsession started after watching a video by Jennifer McGuire on YouTube. I can’t remember which video I saw first but I clearly recall being hooked. I thought to myself wow that looks like fun. Three years later I have an entire room (the pictures only show part of the room and supplies I’ve amassed) dedicated to crafting.

This cabinet holds most of my card-stock, stamps, dies and miscellaneous patterned paper. This (plus what you can’t see) is what partially inspired the cards that I am sharing today. I have so many stamps and dies that I have not been able to use them all. I’m a bit embarrassed to say that I have quite a few that have never been opened. With that thought in mind, I decided to create cards using die sets that I purchased last year. One of those cards is featured in this post.

This blog contains paid advertising banners and affiliate links (Shopping/Affiliate Disclosure). Banners and affiliate links may be used at no additional cost to you. This means that I may get paid a small commission when you shop with a company using a link I provide.
I am not paid by any company to use their products (all products used in my posts have been purchased – by me) and should this ever happen, I will disclose that in a specific post.

Today’s card features the Spellbinders Small Die of the Month from October 2019. For this card I started with a standard A2 size top folding card cut from Neenah Classic Crest Cardstock. I dug through my stash of pattered paper and found this lovely blue and white snow flake pattern that I trimmed using an A2 layered die from Waffle Flower. The pattered paper was adhered to the card base using strong liquid adhesive.
The woman, apron, pie and presents were cut from scrap pieces of card stock (the arms, legs and face were cut from white scraps and colored with a craft marker). All of the pieces were layered and secured using strong liquid adhesive. I added foam squares to the backs of two of the presents to add a little dimension.

After piecing everything together, I cut two small white layers (using the same A2 layer die) and stamped the sentiment (from Concord & 9th’s Stocking Stuffer Stamp Set) in black ink. The larger of the two layers was added to the base using liquid adhesive. Foam tape was added to the smaller layer and thin silver twine was wrapped around it before placing on top of the first layer.

I couldn’t end this post without giving you another idea for a holiday mug, created using Infusible Ink from Cricut . I think think this design is perfect for the holidays and great for gift giving. I found it on DesignBundles. In my previous post One Cut File – Three Different Applications, I provided details where I found the mug used as well as a link to the video I followed to create it. This method is super simple and quick. Try it once and you too will be hooked.
Thank you so much for stopping by. I hope that you have seen something here that inspires you to create your own little work of art. I’ll be bringing you more ideas for the holidays using old and new supplies very soon.
Until next time, don’t forget to spread kindness! – Ouma
Supplies
Need to find the products used to create this card? Most are listed below. Click on the icon below each picture to learn more. (This is NOT a sponsored post). All products were paid for by me. The post does however contain compensated affiliate links which can be used at no cost to you. Thank you so much for support!


